Using EasyPhoto
EasyPhoto is designed to be very easy to use. It follows many conventional Macintosh User Interface guidelines.
You can create email or web ready pictures on your Macintosh by dragging and dropping pictures onto the EasyPhoto window. Actually you can drag disks, folders or pictures onto EasyPhoto, or open then using the "Open..." menu. Once the pictures are open you can rotate, crop, and resize them from within EasyPhoto. After you're done either choose the "Save" menu or simply close the window and a JPEG with the changes you made will automatically be saved to the "EasyPhoto Pictures" folder on your desktop. Actually EasyPhoto will open the folder for you in the Finder so it will be clearly visible when you quit EasyPhoto.
| Tool Palate | |||
| Picture Effects |
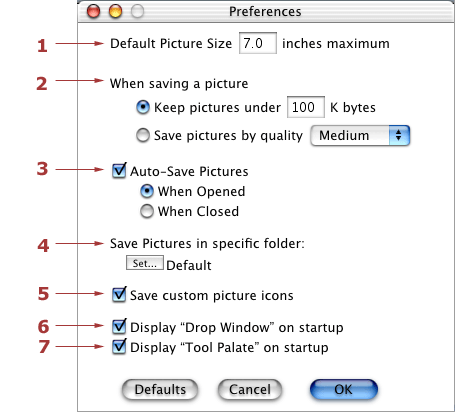
Preferences Dialog
To customize the defaults choose "Preferences..." from the Edit menu. The "Preferences..." menu appears under the application menu on Mac OS X.
When you take a picture with a 3 megapixel digital camera the resolution is approximately 2048X1536. This means that if you were to try to send this picture to someone through email, not only will it be about 2 megabytes in size causing it to take a very long time to upload over your modem, but the picture will be over 28 X 21 inches, larger than most monitors.
1) Default Picture Size
Lets you specify the maximum dimensions your pictures should open as.
For instance if you open a file from your 3 megapixel camera the
default dimensions may be 7 X 5.25 inches. The "7" represents the
larges dimension. This setting is only a preference and can be
overridden by resizing the pictures manually.
2) When saving a picture
You have two options as to how you would like to save your
pictures.
A) Keep pictures under XXX K Bytes.
This option lets you specify the maximum file size in bytes you would like your final pictures to be saved. Specifying 100K means that 2 megabyte (2048K) picture from your camera will be reduced to 100K. The big advantage to saving smaller files is that they are faster and easier to email and display on web pages.B) Save pictures by quality [Lossless, Max, High, Medium, Low, Minimum]
If you prefer to save your files based on quality of output rather than strictly by file size there are a number of options to choose from. Lossless will generate the largest files, whereas Minimum will generate the smallest. You may want to experiment with these options to see which you prefer.
3) Auto-save
Checking this option will automatically save all pictures you open with EasyPhoto
without prompting you for a name and location each time. When this picture is not
checked you will be prompted to save the image when it is closed, at which time it will
be saved in the chosen default EasyPhoto pictures folder.
A) When Opened
This option will immediately save copies of every picture you open and put the pictures in the EasyPhoto pictures folder.B) When Closed
This option saves the pictures whenever they are closed and also puts them in the EasyPhoto pictures folder.
4) Save pictures in specific folder
Clicking the "Set..." button allows you to override the default location where
your pictures will be saved. For instance, you may mount your iDisk and direct
the default location to your "Pictures" folder on your iDisk. The default location
is in the "EasyPhoto Pictures" folder on your desktop.
5) Save custom picture icons
This option saves custom icons in the final picture files. The custom
icons are mini representations of the original files so you will
immediately know which picture it is. The Mac OS X Finer will display
brilliant 128-bit icons and the Mac OS 8/9 Finder displays 32-bit
icons. Custom icons will quickly let you know what the picture is
without having to open it, but they do add about 60K to the size of
the picture file.
6) Display "Drop Window" on startup 
This option creates a target window which hovers above all others
which you can drop picture files, folders, or disks onto. Anything
dropped onto this window will be opened by EasyPhoto. You may prefer
to use the "Open..." menu or drag icons onto the application icon
instead. Under Mac OS X you'll notice this window is resizable.
7) Display "Tool Palate" on startup 
The tool palate allows you to switch between "Crop" and "Red Eye" tools. Whenever the tool palate
is closed the "Crop" tool automatically becomes active.
There are four ways of opening picture files.
1) The "Drop Window"
Drag file, folder, or disk icons onto the "Drop Window" mentioned
in the Preferences section. EasyPhoto will then attempt to open any
and all image files dropped onto this window.
2) Drag & Drop
Drag file, folder, or disk icons onto the EasyPhoto application
icon.
3) Open Dialog
As with all Macintosh applications, you can select "Open..." from
the "File" menu and navigate to the pictures you would like to
open.
4) Mac OS X Camera Menu
When using Mac OS X and additional "Camera" menu will appear in
the menu bar. After a digital camera is attached to the computer, the
"Download Pictures From Camera" menu choice will become enabled.
Choosing "Download Pictures From Camera" will download the original
photos to the EasyPhoto folder on your desktop, and then allow you to
manipulate copies of the originals.
To rotate a picture to the right choose "Rotate Right" from the
"Picture" menu, or use the command key shortcut: ![]() R. Choose "Rotate Left" from the "Picture" menu, or use the command
key shortcut:
R. Choose "Rotate Left" from the "Picture" menu, or use the command
key shortcut: ![]() L to rotate pictures to the left.
L to rotate pictures to the left.
Resizing an image is as simple as growing the window, by dragging it's growbox in the bottom right hand corner. The pictures dimensions will be updated in the title bar in both inches and pixels.
You will notice that as your cursor moves into a picture window it changes from an arrow into cross-hairs. There are two modes of cropping pictures, free-cropping, and fixed size cropping. Free-cropping allows you to crop a picture to whatever size and dimensions you like by placing the cross-hairs at one point then clicking and dragging the mouse to a diagonal corner. After you release the mouse button the picture will be cropped to the rectangle you specified. If you made a mistake and would like to revert the picture to an earlier state, you can always undo your changes. Under the "Picture" menu you will find three choices to crop the image to a fixed size, "480 X 680 Pixels", "4 X 6 Inches", and "5 X 7 Inches". By selecting one of these choices the resulting picture will be in these dimensions.

Once you have created a common effect, for instance slightly adjusting the brightness, you may choose to save it as a macro. By choosing "Create Effects Macro" from the "Picture Effects" menu EasyPhoto will examine all the effects placed on the top working photo and bundle them into a single macro to use at any time. Once you have named your custom effect it will appear as the bottom menu item in the "Picture Effects" menu. You can then open other pictures and apply a complex set of effects with a single menu choice.
Pictures are automatically saved when you quit EasyPhoto and placed inside the EasyPhoto folder on your desktop. To make things even easier the folder with all your pictures is opened for you so you don't have to look for it. You can of course also choose "Save" from the "File" menu at any time as well.
If you want to override the location, and settings specified in the "Preferences" dialog you can choose "Save As..." from the "File" menu.

Choosing "Print..." from the "File" menu will print the top picture window.
Each window has 32 levels of undo and redo. This means that you
can experiment with rotation, cropping, resizing, and still go back
up to 32 actions. To undo an action select "Undo" from the "Edit"
menu or use the command key shortcut ![]() Z. You can also redo an action after it has been undone by choosing
"Redo" from the "Edit" menu, or by using the command key shortcut
Z. You can also redo an action after it has been undone by choosing
"Redo" from the "Edit" menu, or by using the command key shortcut
![]() Y.
Y.